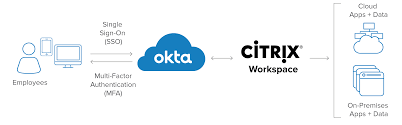
In this 2nd part of my article, I will provide step-by-step guidance on how to configure Okta SSO for domain-joined computer connecting within the corporate network with Citrix Cloud.
In the first part, we have configured:
- Cloud Connectors
- Okta
- Citrix Cloud Okta connection
- Citrix Workspace configuration
- Validate
You can find it here.
In this second part, will will configure:
- The Okta MFA Bypass
- The SSO for internal domain-joined computer authentication to Citrix Cloud
How to Okta MFA Bypass?
- Connect to your Okta Portal.

- Click on Security.

- Click on Networks.
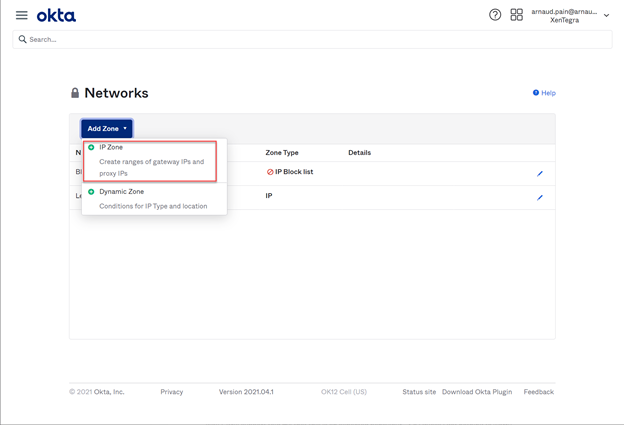
- Click on Add Zone and select IP Zone.
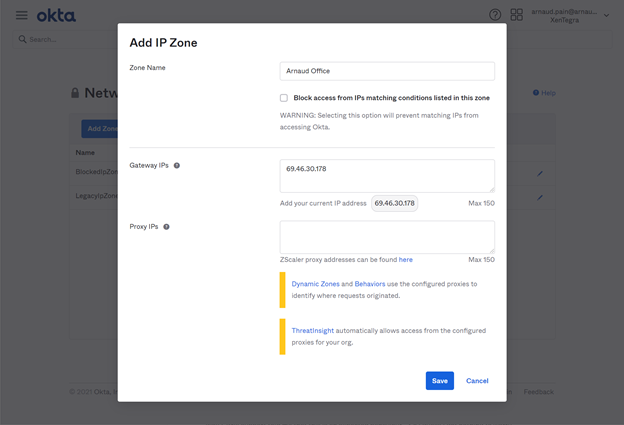
- Provide a name for your Zone and the Gateway IP to be used, then click on Save.
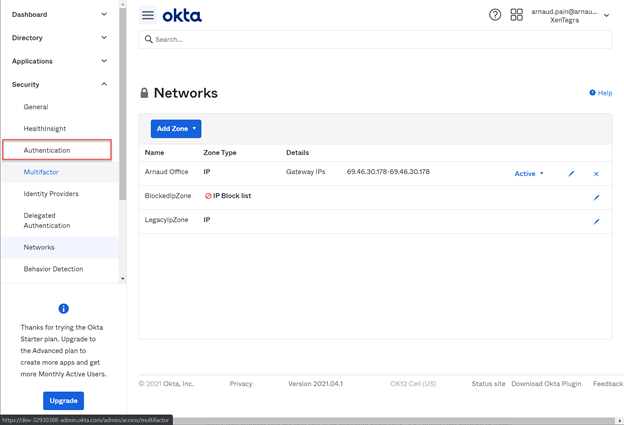
- Click on Authentication.
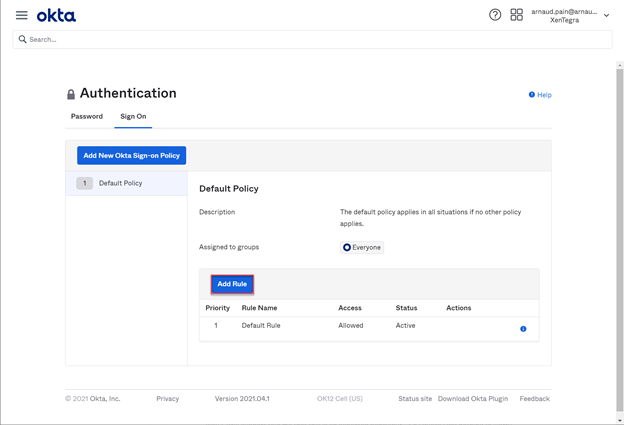
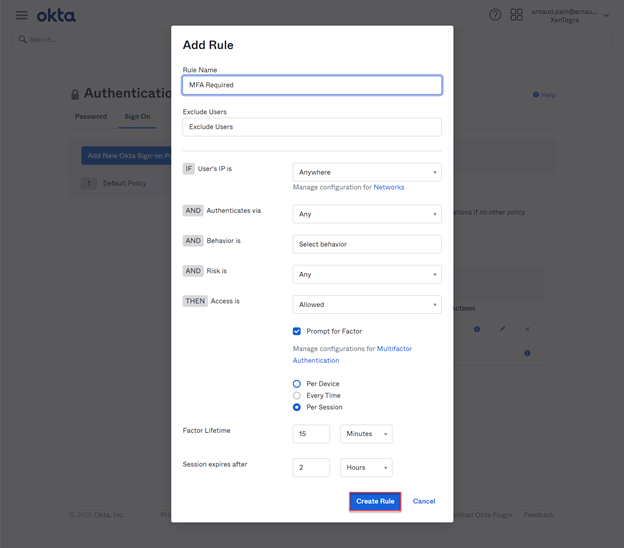
- Click Sign On Tab and on Add Rule.

- Provide a Name for the Rule, select In zone and add your Zone. Uncheck Prompt for Factor and click on Create Rule.
- Create another rule that will require MFA for User’s IP coming from Anywhere.
Validate Okta MFA Bypass
Here is a video showing the Okta MFA Bypass
SSO for Corporate Devices
In the following example, we will consider that we want Corporate devices, domain-joined computer accessing Citrix Cloud from a Corporate (HQ or Office network) to not prompt user for authentication.
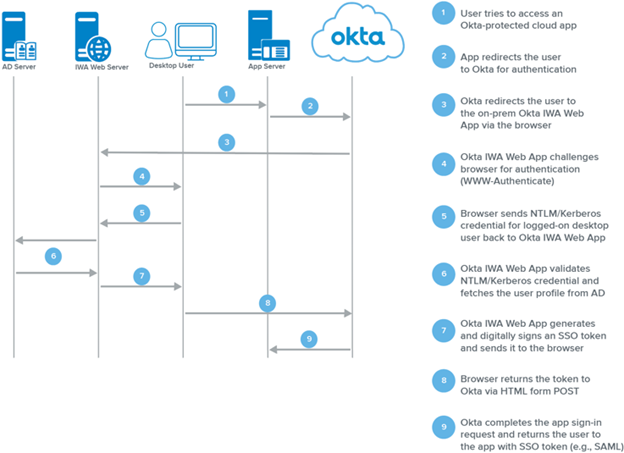
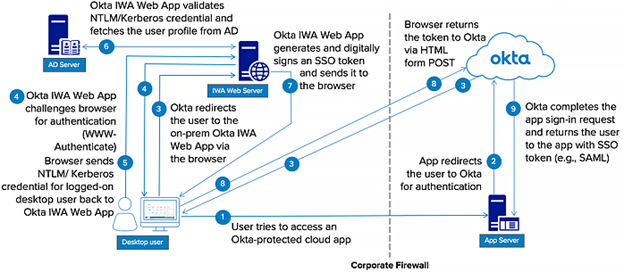
We will use Okta IWA Web agent which is a lightweight Internet Information Services (IIS) web agent that enables Desktop Single Sign-on (DSSO) on the Okta service.
Okta IWA Web agent
What is Okta IWA Web Agent?
The Okta IWA Web agent is a lightweight Internet Information Services (IIS) web agent that enables Desktop Single Sign-on (DSSO) on the Okta service. DSSO allows users to be automatically authenticated by Okta and any apps accessed through Okta, whenever they sign into your Windows network. The Okta IWA Web agent uses Microsoft’s IWA and ASP.NET to authenticate users from specified gateway IPs.
When you have only one forest it doesn’t matter to which IWA agent requests are routed. When you have multiple forests, you need to start taking network configuration into consideration. You need to ensure that user A on machine A only redirects to IWA agents that are in forest A, and user B on machine B only redirects to agents that are in forest B. The suggested way of doing that is redirecting the traffic from Okta to a global redirect URL, and then setting up your on-prem DNS to do the correct routing for that endpoint. You may also need to set up on-prem load balancing and the ability to detect which agents are online and offline into your load balancer.
Okta strongly recommends that you transition to using Secure Sockets Layer (SSL) with the on-premises agent. This is not only an important security provision, but it is also a hard requirement for application authentication (in particular, Windows 10 Universal Applications such as OneNote, Mail).
Okta IWA Web agent installation prerequisites
The following are the prerequisites for installing the Okta IWA Web agent:
- You must have installed and configured the Okta AD Agent and Delegated Authentication must be enabled before you can configure IWA DSSO. See Manage your Active Directory integration.
- Make sure that Port 80 (for http) and Port 443 (for https) are open for inbound traffic on the same server that hosts the Okta IWA Web agent.
- Note: Okta strongly recommends that you enable SSL.
- Windows Server 2008 R2, Windows Server 2012, Server 2016 or Windows Server 2019 and higher. Although the IWA Web Agent will also work with Windows Server 2008, for best results, Okta recommends Windows Server 2008 R2 and Windows Server 2012.
If you use Windows Server 2008 R2, keep in mind the following:
- Microsoft requires Windows Server 2008 R2 users to have an extended support agreement. Also, Microsoft plans to EOL Windows Server 2008 R2 by 2020.
- Additional security configuration is required if your IWA Web agent is installed on a server running Windows Server 2008 R2. For more information, see Enable the Transport Layer Security 1.2 protocol.
- .NET 4.5.2 (minimum) up to .NET 4.6.x and ASP .NET 4.5. If you have a lower version of .NET, upgrade to 4.5.2 or higher.
- To improve the security of our integrations, we now only communicate using TLS 1.2 security protocol. Ensure you are running .NET framework 4.5.2 or later so the AD agent installs correctly. For Windows 2008 R2 TLS 1.2 is disabled by default and must be enabled through the registry. If you have Windows 2008 R2, ensure the following regkeys are set correctly:
[HKEY_LOCAL_MACHINE\SYSTEM\CurrentControlSet\Control\SecurityProviders\SCHANNEL\Protocols\TLS 1.2\Server] “Enabled”=dword:00000001
[HKEY_LOCAL_MACHINE\SYSTEM\CurrentControlSet\Control\SecurityProviders\SCHANNEL\Protocols\TLS 1.2\Server] “DisabledByDefault”=dword:00000000
[HKEY_LOCAL_MACHINE\SYSTEM\CurrentControlSet\Control\SecurityProviders\SCHANNEL\Protocols\TLS 1.2\Client] “Enabled”=dword:00000001
[HKEY_LOCAL_MACHINE\SYSTEM\CurrentControlSet\Control\SecurityProviders\SCHANNEL\Protocols\TLS 1.2\Client] “DisabledByDefault”=dword:00000000
- IIS 7.5 or higher must be installed on the server. If the required IIS version is not installed, the installer quits and you receive an error message.
- AD Agent 3.0.4.x or higher. The Okta AD Agent does not have to be on the same server that hosts the OktaIWA Web agent.
- If your enterprise has more than one domain, see Configuring UPN Transformation.
- The IWA agent doesn’t require any extra privileges beyond the default permissions the user inherits from the Domain Users group. However, note the following:
- The installer configures some additional local permissions for the service account to allow it access the web-application files.
- The IWA agent requires read and execute permissions for files in C:\inetpub\webroot\IWA.
- If you want to use an existing account, then ensure:
- the account is active and the password never expires
- the account has permissions to read and execute for the C:\inetpub\wwwroot\IWA directory and its content
Install the Okta IWA Web agent
The Okta Administrative Account used during Okta IWA Agent installation must have Super admin permissions.
Note: When you install the Okta IWA agent the IP address of the client is added to the LegacyIPZone. For details, see Network Zones and IWA.
- In the Admin Console, go to Settings > Downloads.
- In the SSO IWA Agents area, click Download Latest.
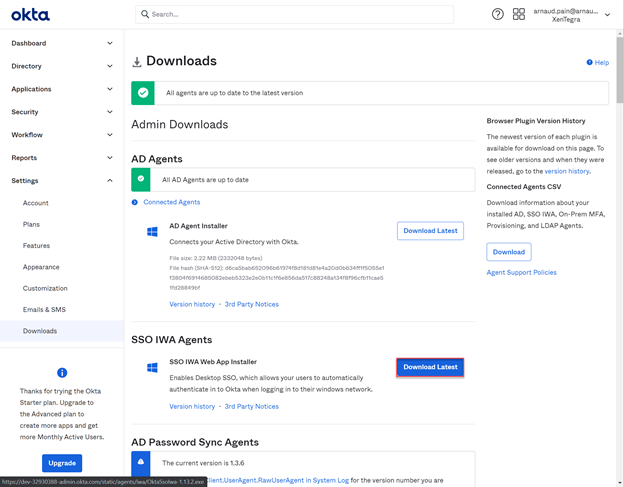
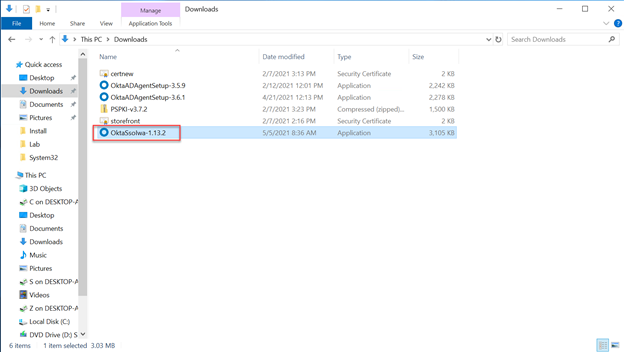
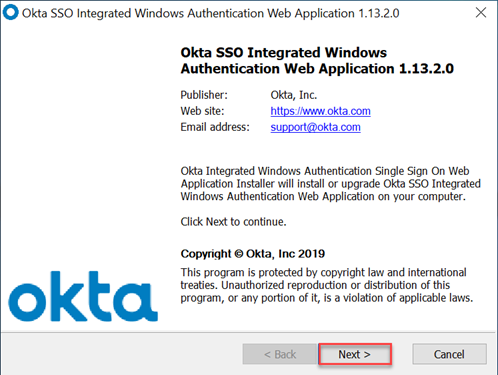
- Browse to the location where you downloaded the installation file and double-click OktaSsoIwa-x.x.x.
- Click Next.
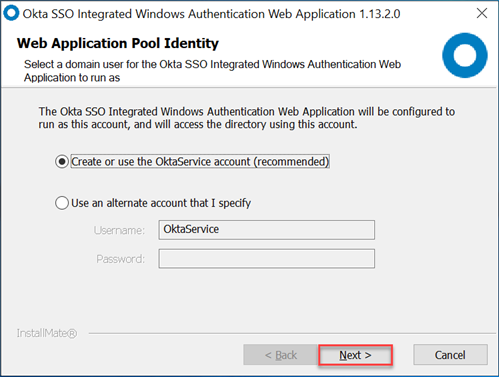
- In the Web Application Pool Identity dialog box, select Create or use the OktaService account, then click Next.
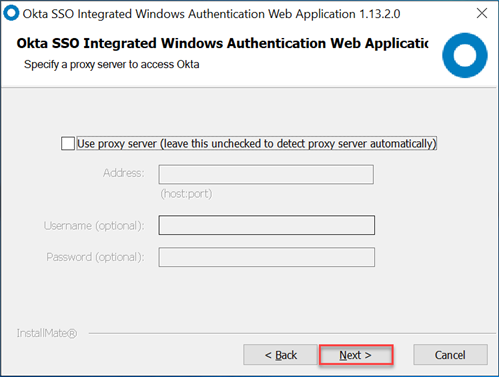
- Optional. When prompted, specify a proxy server for your IWA Web agent.
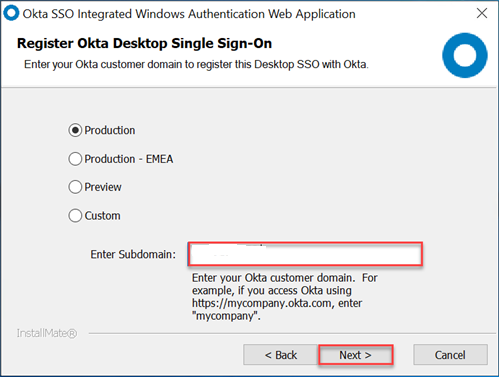
- On the Register Okta Desktop Single Sign-On screen, select an environment (Production, Preview, or Custom), enter your Okta customer subdomain name, and then click Next.
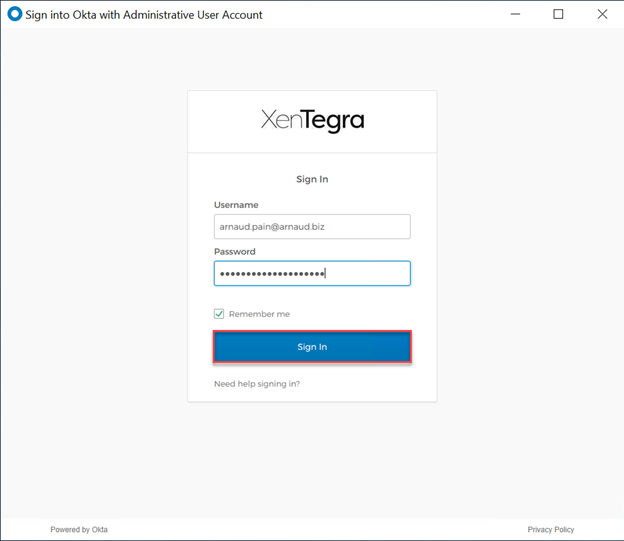
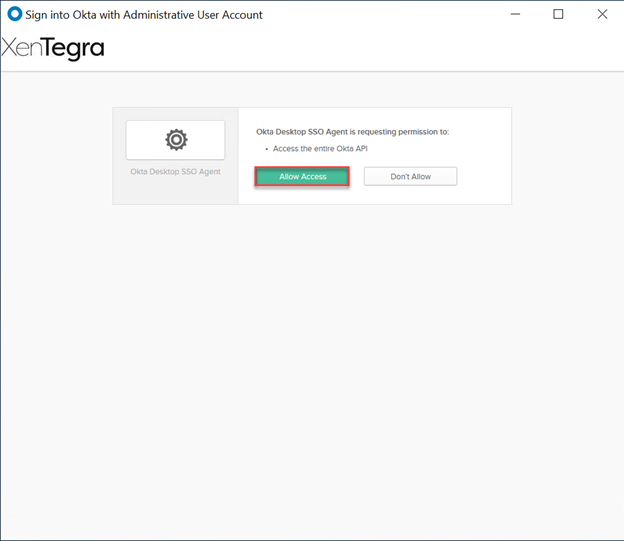
- On the Okta Sign In page, enter your Super admin username and password, and then click Sign In.
- To grant permission to access the Okta API, click Allow Access.
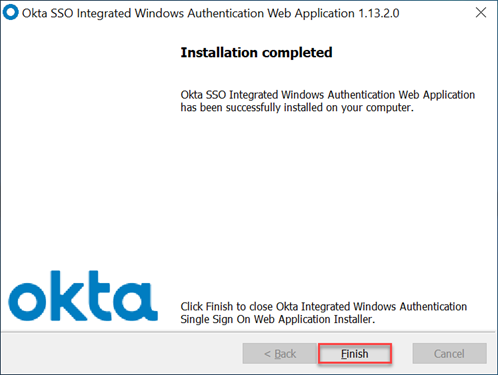
- When the message Installation completed appears, click Finish.
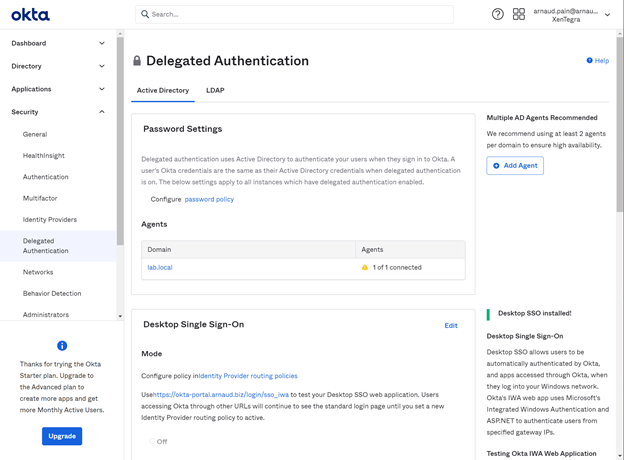
- In the Admin Console, go to Security > Delegated Authentication and in the On-Prem Desktop SSO area, confirm the Okta IWA Web agent is connected.
Configure Windows browsers for SSO
Although IWA SSO may work if you choose not to configure your browser, Okta recommends that you review the relevant information for your browser type and then configure your browser as described if appropriate for your environment.
The Microsoft Edge browser is not supported.
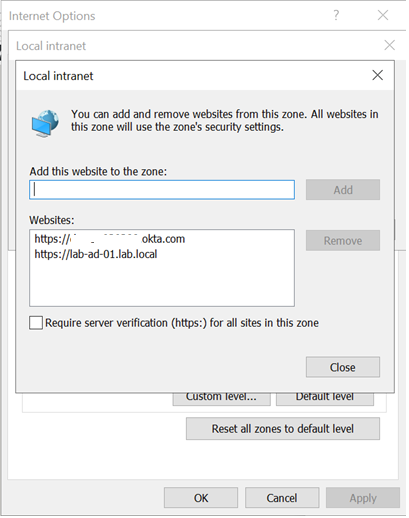
- Add your Okta tenant URL and the URL of the server that hosts your Desktop SSO IWA Web agent to your trusted zone:
Note: The URL hostname.companyname.com is the fully qualified domain name of the server in question. For example, my-iis7-host.corp.acme.com. It is not sufficient for this URL to be listed as a Trusted Site in the Trusted Sites zone.
Most organizations set up a Group Policy to configure this setting in their users’ Internet options.
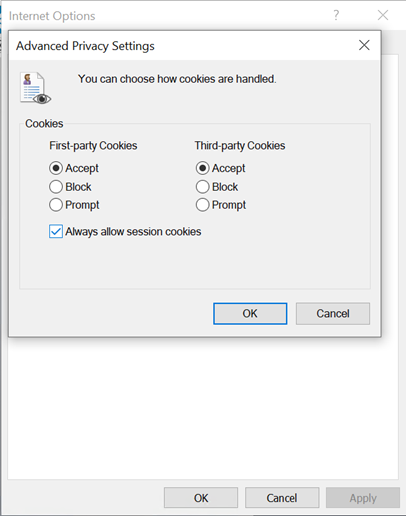
- On your Windows Control Panel, select Network and Internet > Internet Options > Security > Local intranet > Sites > Advanced.
- In the Add this website to the zone field, enter:
https://hostname.companyname.com or http://hostname.companyname.com
and
https://_subdomain_.okta.com or https://_subdomain_.okta-emea.com or https://_subdomain_.oktapreview.com as appropriate.
- Click Add.
- Click OK twice to close Internet Options.
- Configure your browser:
Windows Internet Explorer
- In Internet Explorer select Tools > Internet Options.
- Click the Advanced tab, scroll down to the Security settings, and select Enable Integrated Windows Authentication.
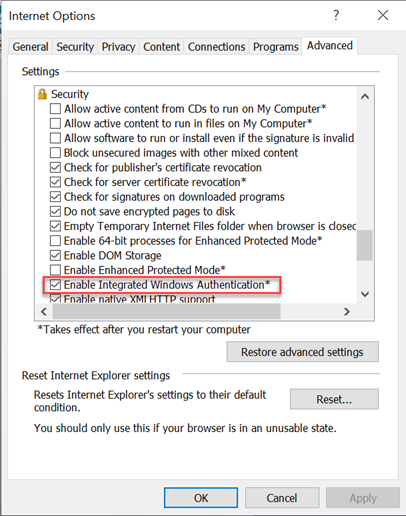
- Click OK.
Make sure that Internet Explorer can save session cookies (Internet Options > Privacy tab). If it cannot, neither SSO nor standard sign in can work.
Mozilla Firefox
The following configuration permits Firefox to properly pass the Kerberos ticket with IWA, but Firefox still warns the user about the transition from an HTTPS page to an HTTP page. To resolve this issue, deploy IWA in HTTPS mode.
- In the Firefox address bar enter: about:config
In Firefox version 3.x and later, a warning message displays. Click the button to clear the message and proceed.
- When the configuration page loads, enter the following in the Search field:
network.negotiate-auth.trusted-uris
- In this field list the host name of the IWA server(s), separating multiple values with a comma ‘,’ if two or more IWA instances are deployed.
Okta recommends that you enter the fully qualified domain name (FQDN) of your IWA host servers. If you do not, you will also need to toggle the following values to TRUE:
If you enter more than one host name, the order does not matter.
network.automatic-ntlm-auth.allow-non-fqdn
network.negotiate-auth.allow-non-fqdn
- Right click the Value column for each of the above and toggle the value to True.
- Click OK.
Google Chrome
IWA is automatically enabled on Chrome for Windows and the capability is allowlist-driven. If your browser is asked by a site to provide the Kerberos ticket, the browser only supplies the ticket to the site if the site is on a allowlist.
The allowlist is provided to the browser at startup using this command-line parameter:
–auth-server-whitelist=
For example:
–auth-server-whitelist=”*hostname.companyname.com”
This tells Chrome that any URL ending in hostname.companyname.comis in the permitted list. Without the ‘*’ prefix, the URL has to match exactly.
The hostname.companyname.com value refers to the server hosting the OktaIWA Web agent.
If the ‘–auth-server-whitelist’ command-line parameter is not specified at startup, the permitted list includes the servers in the Local Machine or Local Intranet security zone. This behavior is consistent with Internet Explorer.
To start Chrome on Windows and supply this command-line parameter:
- Right click your desktop Chrome icon or select Start > All Programs > Google Chrome and right click Google Chrome, and then select Properties.
- In the Target field, move the cursor to the end of the existing value and add the text of your new command-line parameter.
- Click OK.
Activate the Okta IWA Web agent
After you have configured all the settings appropriate to your environment and tested Desktop SSO, do the following:
- In the Admin Console, go to Security > Delegated Authentication.
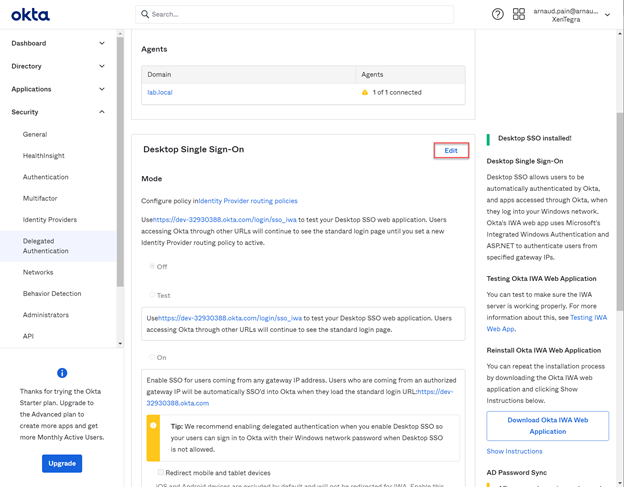
- In the Agentless Desktop SSO area, click Edit and select On.
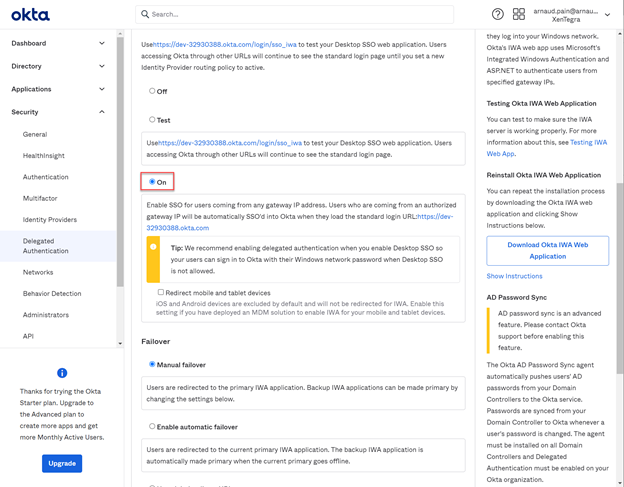
- Click Save.
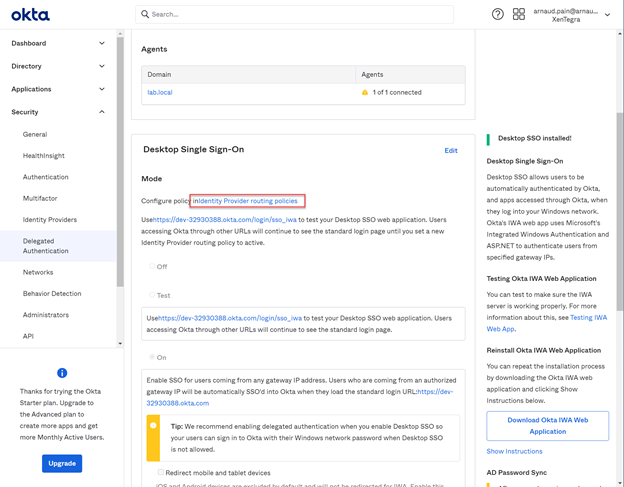
- Click on Identity Provider routing policies.
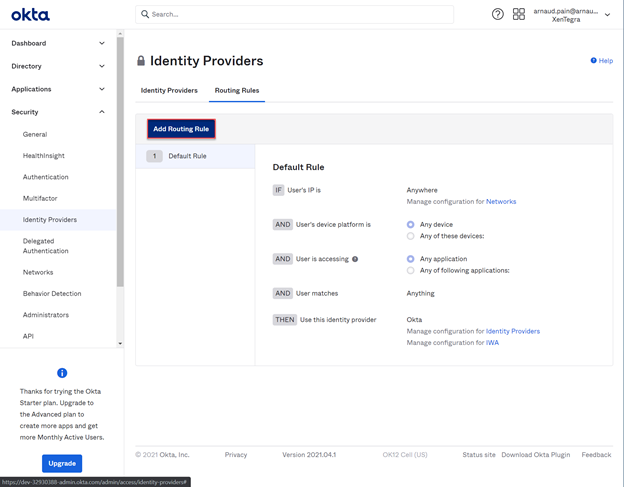
- Click on Add Routing Rules.
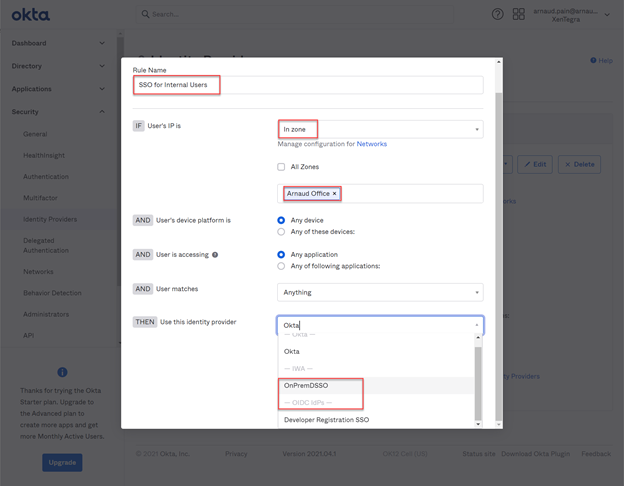
- Provide a name, select In zone, select the required Zone and select OnPremDSSO. Click on Create.
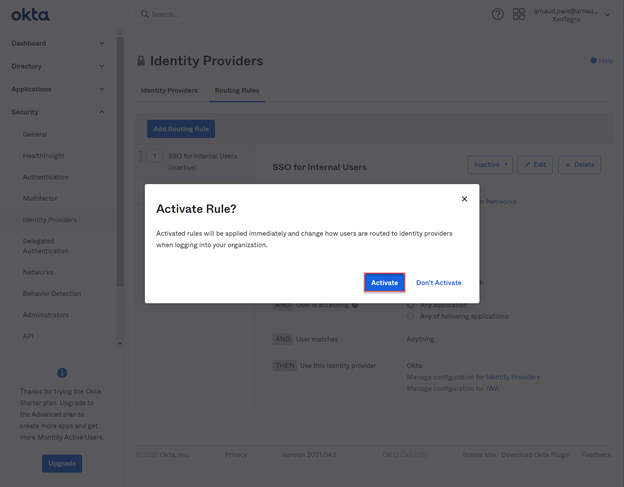
- Click on Activate.
Test the Okta IWA Web agent
After downloading and installing your Okta IWA Web agent, test it to make sure the IWA server is working from a client machine.
- In the Admin Console, go to Security > Delegated Authentication.
- Scroll down to On-Prem Desktop SSO and click Edit.
- In the IWA Agents area, click Edit
.
- Select and copy the URL in the IWA redirect URL field.

- Paste the IWA redirect URL in a browser that has been configured for SSO, and then add authenticated.aspx to the end of the URL. For example, if your IWA redirect URL is https://LAB-AD-01.lab.local/IWA/ enter https://LAB-AD-01.lab.local/IWA/authenticated.aspx in your browser.
- Press Enter .
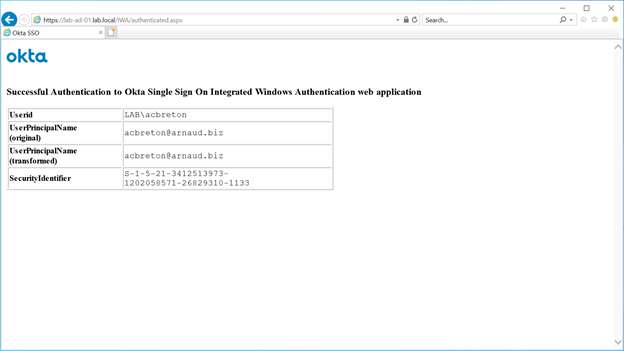
If you configured IWA correctly, three rows of results are returned. If the Okta Sign-In page displays instead of the success message, the test was unsuccessful.
Test Okta IWA Web agent Desktop Single Sign-on
After you have installed and configured your IWA Web agent and set up your browser, do the following:
- In the Admin Console, go to Security > Delegated Authentication.
- Scroll down to On-Prem Desktop SSO and click Edit.
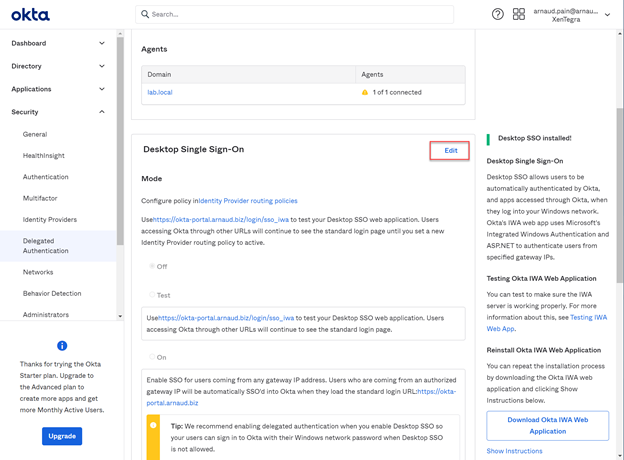
- Select Test and then click the test URL.
If you are authenticated successfully, continue to step 4. If you are not authenticated, check any browser configuration changes that you may have made in either Configuring Desktop SSO with IWA for Windows or Configuring Desktop SSO with IWA for Mac.
- Click Save.
Validation
Here is a video showing the Okta MFA Bypass and SSO for a domain-joined computer accessing Citrix Cloud from a corporate Network.
I hope that that 2 articles will help you understand how to configure Okta MFA Bypass and SSO.
Feel free to share.
Thanks!