Working on a project with 2 AD domain and no trust, the idea was to allow users to connect to ShareFile using their AD credentials.
Here after are the detailed steps to accomplish this
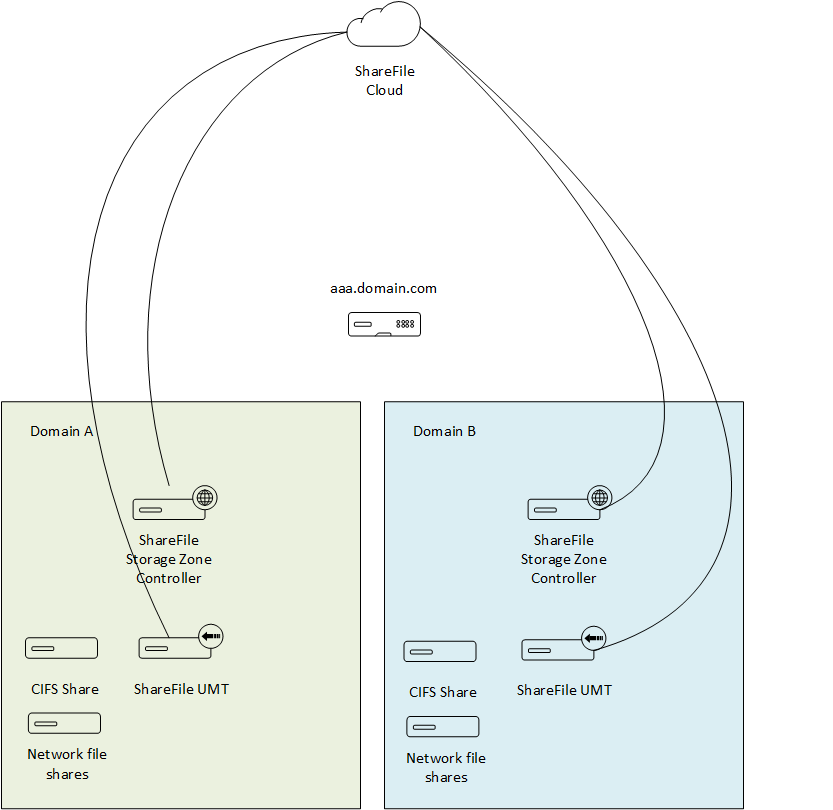
So basically the setup is 2 AD Domain and no trust between the domains.
1 ADC for both Domains
2 Storage Zone Controller and 1 UMT in each Domain
After the basic setup, users were created in ShareFile, however users were not able to connect using their AD Credentials, in fact using UMT the password are never synchronized in ShareFile.
So looking for SSO to ShareFile, there are multiple possible solutions like:
- Citrix Endpoint Management
- ADFS 3.0
- ADFS 4.0
- Dual IdP
- Citrix Gateway
- Microsoft Azure AD
- …
More details here
The solution was for this project to use Citrix Gateway, in fact configure the ADC as IdP with an AAA vServer.
ADC Steps
- Connect to your ADC

- Navigate to Traffic Management > SSL

- Click on Manage Certificates / Keys / CSRs

- Select the certificate that will be bound to your AAA vServer and click on Download
Note: this file will be used later

- Navigate to Security AAA-Application Traffic > Virtual Servers

- Click on Add

- Provide a Name, an VIP and click on OK

- Click on No Server Certificate

- Select the Certificate you want to assign and click on Bind

- Click on Continue

- Click on No Authentication Policy

- Click on Add

- Provide a Name, select Action Type LDAP and click on Add

- Provide a Name, Server IP, Base DN, Administrator Bind DN and password

- Click on Test Network connectivity and ensure result is OK

- Create new Logon Name Attribute (UserPrincipalName), Group Attribute (memberOf), Sub Attribute Name (cn) and new SSO Name Attribute (UserPrincipalName) and click on Create

- Add expression true and click on Create

- Click on Bind

- Click on 1 Authentication Policy

- Click on Add Binding

- Click on Add

- Provide a Name, select Action Type LDAP and click on Add

- Provide a Name, Server IP, Base DN, Administrator Bind DN and password

- Click on Test Network connectivity and ensure result is OK

- Create new Logon Name Attribute (UserPrincipalName), Group Attribute (memberOf), Sub Attribute Name (cn) and new SSO Name Attribute (UserPrincipalName) and click on Create

- Add expression true and click on Create

- Click on Bind

- Click on Close

- Click on No SAML IDP Policy

- Click on Add Binding

- Click on Add

- Provide a Name and click on Add

- Provide a Name and uncheck Import Metadata box

- Provide Assertion Consumer Service Url (https://company.sharefile.com/saml/acs) and click on Add

- Provide a Name, select the certificate and click on Install (needed certificate can be downloaded here, you will need to rename to .cer)

- Select the certificate that will be bound to your AAA vServer and provide in Issuer Name the FQDN of your AAA vServer. Click on More

- In Audience, provide your ShareFile FQDN (https://company.sharefile.com) and click on Create

- Provide Expression HTTP.REQ.URL.CONTAINS(“saml”) and click on Create

- Click on Bind

- Click on Close

- Click on Pen to modify SSL Parameters

- Uncheck boxes SSLv3, TLSv1, TLSv11 and click on OK

- Optionally click on Portal Themes to add a Theme

- Select your Theme, click on OK and Done

- Go to Traffic Management > SSL and click on Manage Certificates / Keys / CSRs

- Select the certificate bound to your AAA vServer and click on Download
Then you will need to implement NAT between the Public IP associated to your AAA vServer FQDN and the VIP created.
ShareFile Steps

- Connect to your ShareFile Control Plane

- Go to Settings > Admin Settings

- Go to Security > Login & Security Policy

- Select Enable SAML, provide Issuer / Entity ID (https://company.sharefile.com/saml/info), IDP (https://aaa.company.com), Login URL (https://aaa.company.com/saml/login) and Logout URL (https://aaa.company.com/cgi/tmilogout)

- Click on Change

- Open the previously downloaded certificate with Notepad++ and copy the info

- Paste the info and click on Saved

- Select Yes to Require SSO Login, select HTTP Post (2048 bit certificate), enable Web Authentication, select Unspecified and click on Save
Validation

- Connect to your ShareFile and click on Sign In under Company Employee Sign in

- Authenticate with a user from Domain B

- You should connect to your ShareFile, click on Log Out

- Click on Sign In under Company Employee Sign in

- Authenticate with a user from Domain A

- You should connect to your ShareFile.
Hope you like this article, feel free to share.