Citrix has released a new version of XenMobile Server 10.18.6
The latest version of XenMobile has these new features and improvements:
- Manage OS updates for Workspace hub devices
- Deploy PowerShell scripts to Windows Desktops and Tablets
- Use OpenVPN for Chrome OS devices
- Fixed issues
Manage OS updates for Workspace hub devices
You can now use the Control OS Updates device policy to specify an update file for Citrix Ready workspace hub devices. When a workspace hub device checks in with XenMobile Server, the device downloads the update file and installs it automatically.

- URL: The URL where you uploaded the OS update file. First, download the OS update file from the OS vendor and upload it to a share accessible by http or https. Do not protect the share with any credentials. The update file for a CLASS only applies to devices of the same CLASS.The URL must end with the naming used in the OS update file in the format VERSION-CLASS-KERNEL-ARCHITECTURE-BUILDNUM.lfi.
When Citrix Ready workspace hub device checks in with XenMobile Server, the device downloads the update file and installs it automatically. The installation happens whether or not the device has a lower or higher OS version that the one being installed.
The policy applies only on devices of the same CLASS as the update file configured in the policy. For example, if the policy has an update file for an NComputing device (NC class), then only the NComputing devices checking in receive the update. If a ViewSonic device (VS class) checks in, XenMobile doesn’t apply the update.
- OS Version: The OS version in the format VERSION-CLASS-KERNEL-ARCHITECTURE-BUILDNUMor VERSION-CLASS-KERNEL-BUILDNUM.
Deploy PowerShell scripts to Windows Desktops and Tablets
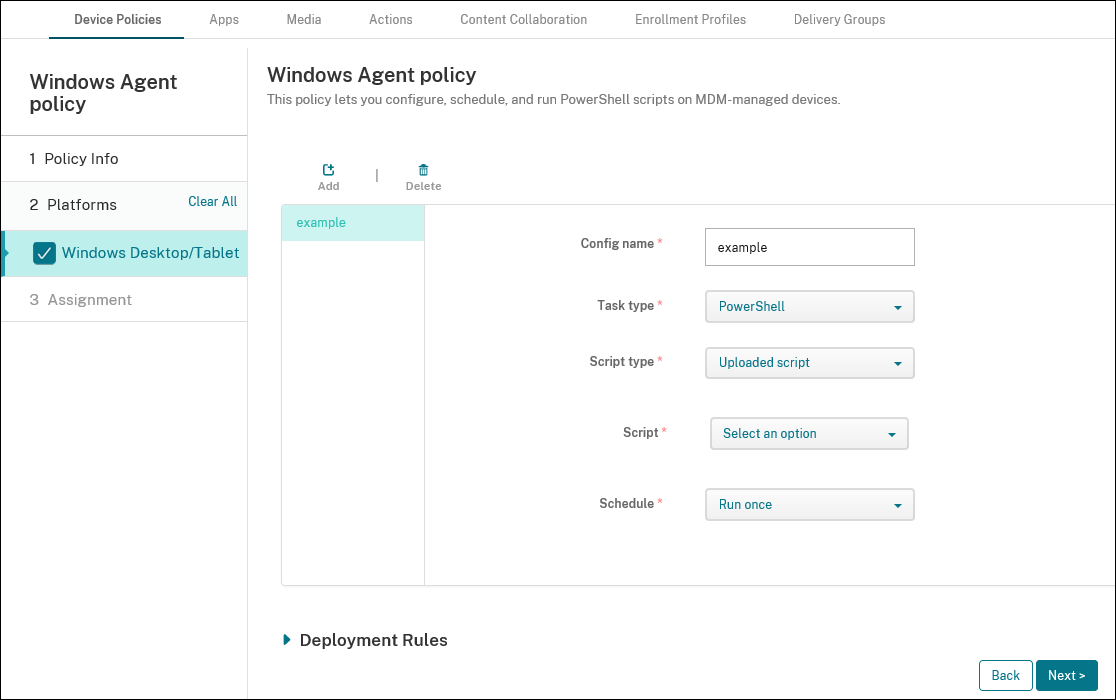
A new device policy enables you to upload or specify a location for PowerShell scripts that you can deploy to managed Windows Desktops and Tablets. After you create the Windows Agent device policy, you then deploy the script files by uploading them to your console as an enterprise app. For more information, see Add apps.


- Config name: Type a descriptive name for your configuration.
- Task type: Select PowerShell.
- Select script location: Select Uploaded script for scripts that you have uploaded to XenMobile Server or select Script location URL for scripts hosted externally.
- Select script: If you chose Uploaded script, select the script to run.
- Enter script location URL: If you chose Script location URL, enter the location of the script to run. This URL should deliver the script as a payload. XenMobile doesn’t support URLs that deliver scripts as a JavaScript download.
- Run Schedule: Select Run Once to run the selected script one time.
To check on the status of a script, navigate to Manage > Devices in your console. Select the device on which you want to check the script status and click Edit. Under Properties, you can check the status of your scripts by clicking Download under the Windows Agent heading.
Use OpenVPN for Chrome OS devices
You can use the VPN device policy to allow Chrome OS devices to connect to a private network (VPN) through OpenVPN.

- VPN connection name: Type a user-friendly description of this connection. This setting is required.
- Priority of this network: Type a suggested priority value for this network. Use an integer value.
- Connection type: In the list, select Open VPN as the connection type.Selecting Open VPN reveals more settings that are specific to OpenVPN connections. Scroll to see all settings.

- Host: Type the host name or IP address of server the VPN connects to. Required for OpenVPN. The value you type here is the primary host. Optionally, you can configure extra hosts to connect to in case the primary host fails to connect.
- Auto connect: Select whether the VPN connects to the host automatically. If this setting is set to ON, the VPN connects to the host automatically. Default is OFF.
- Port: Type the host server port number. Default is 1194.
- Protocol: Type the protocol used when communicating with the host server. Default is UPD.
- User authentication type: In the list, choose the required form of user authentication:
- None: No password or one-time PIN required.
- Password: Password only. You can configure this value or let the user provide it at the time of connection.
- Password and OTP: Password and one-time PIN. You can configure these values or let the user provide it at the time of connection.
- OTP: One-time PIN. You can configure this value or let the user provide it at the time of connection.
- User name: Type the user name that is used to connect to the VPN. If not specified, user is prompted for a user name at time of connection. This value is subject to text string expansions:
- ${LOGIN_ID} expands to the email address of the user before the @ symbol.
- ${LOGIN_EMAIL} – expands to the email address of the user.
- Password: Type the password text string that is used connection to the VPN. If not specified, user is prompted for a password at time of connection.
- OTP: Type the one-time PIN text string that is used to connect to the VPN. A password text string. If not specified, user is prompted for a one-time PIN at time of connection.
- Save credentials: Select whether user credentials are saved after a connection. If this setting is set to OFF, users must enter their credentials each time they connect.
- Cache credentials in memory: Select whether user passwords and one-time PINs entered by users are cached in memory on the device. If this setting is set to ON, caching is enabled. Default is OFF.
- Auth: Type the authentication algorithm used to secure the connection. Defaults to SHA-1.
- Authentication retry type: In the list, select the way the VPN responds when user credentials are not verified. Options are Fail with error on retry, Retry without asking for authentication, and Ask again for authentication each time. Default is Fail with error on retry.
- Cipher: Type the cipher algorithm used to secure connection. Default is BF-CBC.
- LZO compression: Select whether to use LZO compression for the VPN. If this setting is set to ON, the VPN uses LZO compression. Default is OFF.
- Adaptive compression: Select whether to use adaptive compression for the VPN. If this setting is set to ON, the VPN uses adaptive compression. Default is OFF.

- Extra hosts: Configure a list of hosts to try, in order, if the device cannot connect to the primary host. Configuring these extra hosts is optional.
- Click Add to the right of Host name.
- Type the host name or IP address or server.
- Click Save.
- Repeat these steps to add more extra hosts.
- Server poll time-out in seconds: Type the maximum number of seconds to try to connect to this server before moving on to the next server in the list.
- Ignore default route: Select whether the host ignores VPN gateway. By default, the device creates a default route to the gateway address advertised by the VPN server. If this setting is set to ON, split tunneling is allowed. Default is OFF. If the server pushes a redirect-configuration flag to the client, this setting is ignored.
- Key direction: Type the key direction text string. The key direction is passed in as
--key-direction-string. - Peer certificate type: Type server to check the peer certificate type. If not set, the peer certificate type is not checked.
- Push peer information: Select whether peer certificate information is pushed to this host. If On, peer information is pushed. Default is Off.
- Peer certificate extended key usage: Type the explicit extended key usage text string, in OID notation, that the peer certificate must be signed with. Optional.

- Key usage numbers: Add hex-encoded key usage numbers. Click Add to the right of Key usage numbers and then type a key usage number. Repeat those steps to add other key usage numbers.
- Peer certificate TLS: Choose Server from the list to require peer certificate signing based on RFC3280 TLS rules. Default is None.
- Data channel key renegotiation delay in seconds: Type the maximum number of seconds before renegotiating the data channel key.
- Bandwidth limit: Type the maximum bandwidth of outgoing tunnel data, in bytes per second.
- Static challenge: Type a text string used in a static challenge response. Echoing is always performed.
- TLS auth key contents: Paste the contents of the TLS authentication key. The contents of the TLS authentication key usually starts with “—– BEGIN OpenVPN Static Key”. If not set, TLS authentication is not used.
- TLS remote connections: Type the X509 name or common name of server hosts that this VPN allows connections to.
- TLS minimum version: Type the minimum version of TLS used by OpenVPN.
- Verbosity level: Type the verbosity level. If not set, this setting defaults to the OpenVPN verbosity level.
- Verify hash: Type the verify hash text string. If set, this value is passed as the
--verify-hash-stringargument to OpenVPN, which specifies the SHA-1 fingerprint for the level-1 certificate. - Verify host’s X509 name: Type the name that the X509 name of the host is compared to.
- Verify host’s X509 name type: In the list, select which of the X509 name of the host is verified. The options are name, name-prefix, and subject.
Fixed issues
After you restart XenMobile Server, your settings in the Log Settings page revert to the defaults.
The XenMobile console doesn’t accept valid Google play credentials for Android. The following error message appears: Unable to render embedded object.
Known issues
When you add and save a Salesforce_SAML app with provisioning enabled as a Web and SaaS app in the XenMobile console, the following error appears: Invalid Application details, Please try again.